With all My Love

This particular card I made in a 6 1/2"x6 1/2" inch card front and attached it to a 6"x6" white card base. You could easily adjust the outside dimensions to make the outside front card a 6"x6".
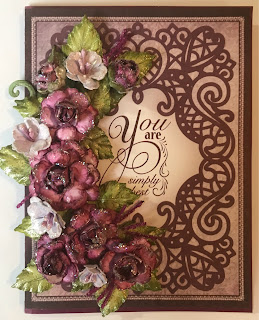
I started with a 6 1/2"x6 1/2" piece of medium color lavender cardstock. I then adhered a light lavender piece of cardstock on top that measures 6 1/4"x6 1/4". I cut a piece of cardstock from the Lush Lilacs Paper Collection at 6"x6" and adhered to the light lavender piece of cardstock. Cut one large oval die from the Eyelet Oval Die with the scalloped edge, and the 3.25x5" centerpiece in open lace work, in white cardstock. I used the sponge daubers and lightly colored the edges in Lulu Lilac Ink. Cut two pieces from white cardstock from the Petite Pocket Accents Die. Glue the Petite Pocket Accents Die onto the oval.
Stamp your sentiment from the For My Friend Sentiments in Jet Black and punch out with a small oval punch and scalloped edge punch. Use pop dots to adhere the sentiment on the scalloped edge oval. Pop Dot or glue your sentiment to the oval.
Create your roses. You can use Foam Paper or make your roses using the Deluxe Flower Shaping Paper. Both ways will give you good results. Stamp your image using the Classic Rose Cling Stamp in Lulu Lavender. Color your rose images lightly using Lulu Lavender. Using the Classic Rose Die cut your rose images out using your cutting machine. Put your blossoms in the 3D Rose Shaping Mold and run through your cutting machine. Assemble your roses using Designer Dries Clear Adhesive or hot glue. I made one large rose, and 3 medium sized roses.
Using your Leafy Accents Cling Stamp and Fern Green, stamp onto the Deluxe Flower Shaping Paper. Color your image with Leaf Green. Cut the images out using the Leafy Accents Die and shape using the 3D Leafy Accents Mold.
I made 10 small blossoms from the Tweet Cherry Blossoms Collection. Stamp the image on Deluxe Flower Shaping Paper in Lulu Lavender. Lightly color the images with the Stack and Store Dauber and cut images out with the Tweet Cherry Blossoms Die. Shape using the 3D Cherry Blossom Shaping mold. I used two images per completed blossom. Use two stamens per flower and I color the stamens using the Lulu Lavender Ink. Assemble Blossom with adhesive of your choice.
Create a spray in the upper left corner and a larger spray in the lower right corner.
Products Used: HCDP1-287 Lush Lilacs Paper Collection, HCPC-3844 For My Friend Sentiments, 6x12 Cardstock, HCD1-7212 Petite Pocket Accents Die, HCD1-776 Eyelet Oval Die, HCPC-3866 Tweet Cherry Blossoms Stamp Set, HCFB1-474 3D Cherry Blossom Shaping Mold, HCD1-7230 Tweet Cherry Blossom Die, HCPC-3752 Classic Rose Cling Stamp Set, HCD1-7110 Classic Rose Die, HCD1-462 3D Rose Shaping Mold, HCPC-3835 Leafy Accents Cling Stamp Set, HCD1-7193 Leafy Accents Die, HCFB1-467 3D Leafy Accents Shaping Mold, HCPP1-468 Deluxe Flower Shaping Pack 25, HCDA2-450 Stack and Store Daubers Pack 30, HCST1-401 Deluxe Flower Shaping Kit, HCS1-457-1 Pastel Pearls Stamens - Small, HCFS1-465 Art Foam Paper, DDOTS - Double Dots, 159723 Designer Dries Clear Adhesive, 352854 Metal Tip for Adhesive Bottles, 359848 Spellbinders Tool N One, D110305 Rubber Stamp Mat Pad, SUAH05 5 Pc Acrylic Block Set, Hot Glue Gun, Glue, Water Mister, Scissors, Paper Trimmer, Die Cutting Machine, Ink - Ranger Archival Ink Leaf Green, Fern Green, Lulu Lavender, Stazon Jet


Love this one too! I love the way you manipulated the dies inside the oval, great job!
ReplyDelete