I have been asked to demonstrate how I make my Classic Roses. They are really pretty simple. I start with the Classic Rose Die from Heartfelt Creations, the Deluxe Flower Shaping Paper, the Golf Tools and some Ink. You can get all of these items on the Heartfelt Creations web page. I like to use hot glue but I have made many of them with the Designer Dries Clear Glue too! I prefer this Deluxe Flower Shaping Paper because it is very heavy and stands up to all the shaping it takes without falling apart. It also keeps a nice sturdy flower shape indefinitely. I die cut out four of the same size petal shapes. (The one pictured here is the next to the largest size.) I use ink to "shuck" the edges with a sponge dauber and color the inside with a soft makeup brush. I use the Golf Tool Shaping set from HC exclusively for shaping these roses. I poke a hole in the center of each of the four flower petal groups, with the Golf Tool. ...
Here is the lovely little Floating Hydrangea Card that I promised to show you. It is super easy to assemble. I used the Fresh Cut Hydrangea Collection from Heartfelt Creations for the lovely flower on the front. I have not demonstrated how to assemble the hydrangea because there are wonderful videos on the Heartfelt Creations website. I would encourage you to view the video and also check out the gallery of other cards made with this collection. I did cover the back of the flower because as you can see in the photo you will be able to view the backside of the flower. The die I used for the card is the Elegant Swirl Gateway Die. This is a picture of all the pieces you will need to complete the card. I will give you a little instruction about how to achieve these cuts. I recommend using a good quality card stock to achieve the best cuts with your die. To make the shaped card base I fold a piece of white card stock in half. I beli...
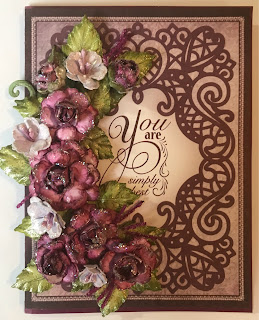
This is a simple little card made from the Raindrops on Roses Paper Collection. I made the card base from a piece of dark plum cardstock measuring 5 1/4"x8". Fold in half. I used pop dots to adhere the paper with the sentiment to the front of the card. Using the Deluxe Flower Shaping Paper I stamped Classic Roses in StampinUp Blackberry Bliss. I then colored the stamped images in lightly with StampinUp Berry Burst Ink. I die cut the Roses using the Classic Rose Die. I like to lightly mist the roses with water when I put them in the 3D Rose Shaping Mold. For this card I made one large rose, 4 medium roses and 2 rose buds. Use the Deluxe Flower Shaping Kit to finish shaping the roses and assemble with hot glue or Designer Dries Clear Adhesive. Using the same technique I stamped 8 of the Tweet Cherry Blossoms on the Deluxe Flower Shaping Paper. 8 stamped images will give you 4 finished blooms. I stamped them in LuLu ...


Comments
Post a Comment