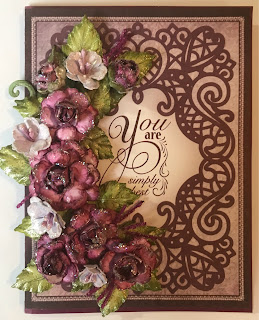
Here is the lovely little Floating Hydrangea Card that I promised to show you. It is super easy to assemble.
I used the Fresh Cut Hydrangea Collection from Heartfelt Creations for the lovely flower on the front. I have not demonstrated how to assemble the hydrangea because there are wonderful videos on the Heartfelt Creations website. I would encourage you to view the video and also check out the gallery of other cards made with this collection.
I did cover the back of the flower because as you can see in the photo you will be able to view the backside of the flower.
The die I used for the card is the Elegant Swirl Gateway Die.
This is a picture of all the pieces you will need to complete the card. I will give you a little instruction about how to achieve these cuts. I recommend using a good quality card stock to achieve the best cuts with your die.
To make the shaped card base I fold a piece of white card stock in half. I believe I used a piece about 7 inches by 12 inches, Place the largest die from the set just a little bit past the fold line of the cardstock. Tape it down and run it through your die cut machine. I like the Big Shot Pro for these large dies because the Pro can handle up to 12 inch dies.
Here is your shaped card base!
Now place the dies onto the front of the card and tape down the center arched piece. Then you can remove the outer die. (The outer die helps you get the arch centered nicely)
Open your card base up and run this through your die cut machine. This will give you the arched opening!
Now I take a piece of white card stock about 6" x 3 1/2" and place the arched piece on the paper and tape it down and run that through your die cut machine. This will give you the piece that you will attach your acetate to later.
This is what your piece should look like after you get the arch cut out. I then use a pair of scissors and just round off the corners, be sure to leave about 1/2 inch all the way around the arch so you can apply your scor pal tape to affix the acetate.
I laid this piece on my acetate and taped it down and trimmed my acetate to fit just inside the paper guide.
I ran 1/8" Scor Pal tape around the inner edge of my white arched paper and taped my acetate to the white frame.
After you attach your acetate you will put more score pal tape around the arch on the acetate side. Peel the paper backing off of the scor pal tape and affix the white frame on to the inside cover of your shaped card base. Take your time and line up the arch perfectly.
This is what the inside cover should look like. The acetate is between the card front and the little frame that you made. Now you will cover the inside edge of both the front and the inside cover with the little piece that has the little dots on it and then cover both edges with the elaborate outer piece.
The inside piece is cut from the large elaborate piece and the elaborate middle section.
I used three dots of hot glue to affix the hydrangea to the acetate. I hope this will help you create a floating hydrangea card. It is pretty simple and so beautiful. You will love it.


Comments
Post a Comment