Posts

Love Is The Key - Wild Roses

Image
Make your card base from White Card Stock cut to 11" x 6 1/2".  Score on the long edge at 5 1/2". From White Card Stock 3" x 6 1/2" die cut the Regal Border on the right side, long side.  This will be the back layer.   From the Luxe Gold 6 1/4" x 6 1/4" cut another of the same die.  This is the middle layer.  From 6"x 6 1/4" White Card Stock cut the same die. This is the top layer.  Glue on to card base using Designer Dries Clear Adhesive. Cut 1 White Card Stock Oval from the Eyelet Oval and repeat using the Luxe Gold Card Stock.  Offset them slightly and glue together then adhere to your card front.  Cut the middle oval from the Eyelet oval and glue to the center of your gold and white oval. Decorate your card using the Wild Rose Stamp and Die, Large and Small. I like to use three layers of the same size when making my blossoms and two layers for the tiny buds with the third layer shaded in a leaf green. I hand s...

Classic Roses for Mother's Day

Image
My mother has always loved roses especially pink ones!  I made this card to celebrate her on this Mother's Day. The base of the card is white card stock cut at 5" x 6 1/2". On this you will affix a piece of pink card stock cut at 4 3/4" x 6 1/4".  You can use pop dots or clear adhesive. I use pop dots for added dimension. Cut a piece of green card stock at 7 3/4" x 6 inches. (The photo below is actually shown in white) Score on the long side at 4 1/2".  Fold on the score line and crease with bone folder.  To make the flap of the card/envelope I marked at 3" on the flap and drew a line lightly in pencil to 1/8" below the score line. Do this on both sides to give you the point. Using the V shaped piece in the Ornate Pocket Accents cut out one in the same green card stock color you have used. Snip it in half at the V giving you two trim pieces you will apply to the edge of your card/envelope flap. Don't worry about the...

Cottage Garden Hydrangea Mother's Day Card

Image
I hope you have been enjoying the Cottage Garden Hydrangea Collection as much as I have.  I think the blue and white colors are just the perfect crisp colors for a Mother's Day Card.  This one is really simple and you can embellish as much or as little as you like. To begin you will take a piece of patterned paper of your choice from the Cottage Garden Collection.  I cut this piece at 11" x 4 1/2" and score on the long side at 2 3/4" and again at 5 1/2".  This gives you the base for your card. Cut another strip from the same paper at 1 1/2" x 11" and score the same, 2 3/4" and again at 5 1/2"  That is it for your base card! Use your bone folder to crease and you have made the base.  To mat these pieces I cut two pieces of 4 1/4" x 2 1/2" for the short mat pieces and one piece at 4 1/4" x 5 1/4" for the back. Mat the strip with two pieces 1 1/4" x 5 1/4".  Glue the mat onto the strip.  The one on ...

Butterfly Kisses and Wonderful Wishes Baby Card

Image
So many of you asked for some instructions to make this sweet little z-fold baby girl card I will be happy to help.  Please let me know if you have any questions.  This card is super simple and so fun to make and has so many variations. You start with your base which measures 11 inches wide by 4 1/4".  Score at 2 3/4" and again at 5 1/2"  Cut a strip 1 1/2" wide by 11" and score at the same measurements.  I didn't take a picture of attaching that top piece but you can see from the completed photo how it will attach to your base.  I would mat my base card and my strip before attaching the top z-fold piece.  After that you are ready to assemble your little crib.  You will need two of the pieces from the Album Tags and Accents and if you want a little sentiment on the back like I have in the picture then you will need a third one. On the end piece of the side rails  attach a piece of Scor-Pal tape to the front of each end of b...

Special Wishes

Image
I created this card to be part of a set of four for a special friend's birthday.  I call this one Special Wishes.  It was super simple to put together.  I hope you will get inspiration from this card to make one of your own. I absolutely fell in love with the Raindrops on Roses Paper Collection.  The burgundy and plum color scheme just really went well with the Classic Roses Stamp and Die Set.  I am sure you will notice that there is just one teeny tiny Tweet Cherry Blossom but you could certainly use as many as you like, or none at all if you don't have that stamp and die set.  I like adding the white highlights such as the baby's breath from the Wild Aster Spray and I usually cut out a dozen or so to keep on hand. The little blossoms just lighten up and contrast with the dark plum colors. I cut the card base at 8"x5 1/2" from a light lavender card-stock.  I score and fold in half on the long edge at 4".  Using the Eyelet Oval ...

Moonlight Roses

Image
Here is a card I made for a special birthday.  It was really very simple using the Heartfelt Creations Rounded Lattice Window Die and Classic Roses. This was actually my first card for 2020 and one of my first attempts using foam for the roses.  I hope that you will find this card inspiring. Begin by using the 6"x6"Shutter Fold Card in White.  You will need to cut two 6" circles in the paper of your choice using the outer circle die from the Rounded Sunlight Window Die Set.  I used this beautiful blue plaid paper from the Buttons and Blooms Paper Collection. I then cut the two circles in half, giving you four half circle pieces to cover the two front half circles on the card. Find a pattern of the coordinating paper that you like and cut a 6x6" square for the back opening of the card. Next you will need to cut out four of the Rounded Lattice Window Die from the Lux Gold Cardstock.  Using Designer Dries Clear Adhesive glue the gold die cuts over th...

Circle Step Card You Inspire Me

Image
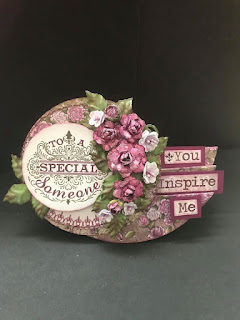
Here is a card I made using the Raindrops on Roses Paper Collection by Heartfelt Creations.